Background
Timo Salonen won World Rally Championship title in 1985 as well as 11
WRC rallyes with a group-B Peugeot 205T16. He ended his rallying career
in the mid 1990:s after competing in long distance desert rallyes with
Citroen, but in 2002 he took part in Rally Finland for old times sake.
The car was again a Peugeot, but this time it was an updated '99 yearmodel
206 WRC finished by Bozian private team. Timo made a clean run, kept his
car almost intact and finished the rally in 14th place.
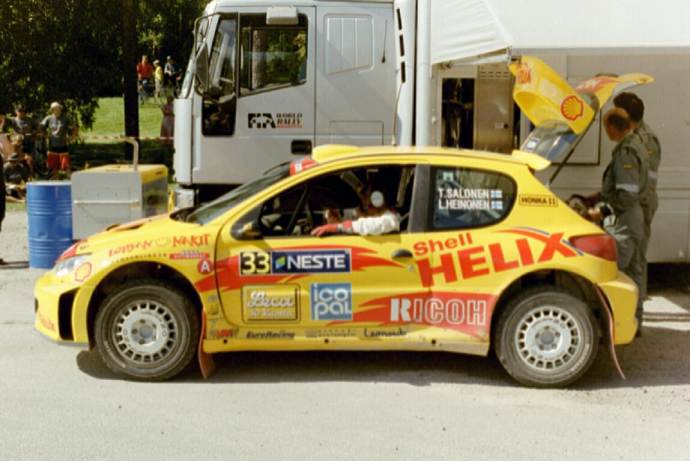
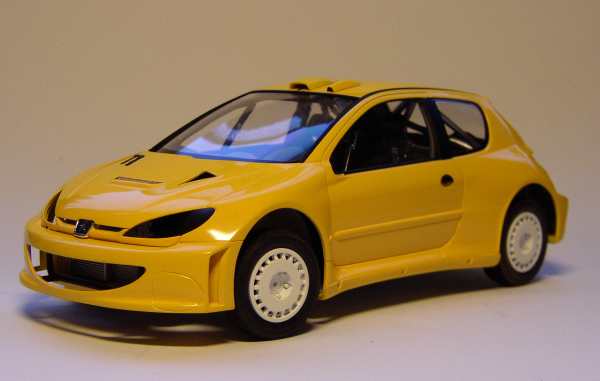
Salonen's Peugeot with its striking yellow livery caught my eye when
I was following the rally live at a couple of stages, but the final decision
to make a model of the car came when I noticed that Renaissance of France
had released a set of aftermarket decals for this particular vehicle.
I ordered the decals from www.mediamixhobby.com.sg
at Singapore, which has a really nice selection of rally and race car
related models and aftermarket parts. Service at Mediamix was great and
my order came quickly, so I can recommend this shop for other car modelers
too.
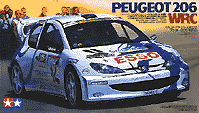
The base kit I used for this model was Tamiya's original 206 WRC Peugeot,
which has correct details for 1999 Peugeot. The kit has tarmac tires and
suspension, so some modifications has to be made for a gravel rally version.
Most visible differences are wheels and tires, higher suspension set up,
gravel shields on sides and mudflaps. After I started my kit Tamiya released
a 206WRC with gravel set up, but it is a later version with different
bonnet details so it can't be easily used to make Salonen's Peugeot. However
you can probably snatch the gravel parts and replace the tarmac parts
with them in the '99 kit with little or no trouble at all. Another difference
in Salonen's car is a newer version of the front bumper, which means that
you'll have to scribe the light covers to a different shape to make an
accurate model. Salonen's car also has an extra roof scoop which has to
be made from scratch and the setting of antennas differs from Tamiya's
kit too.
Making the model
Wheels
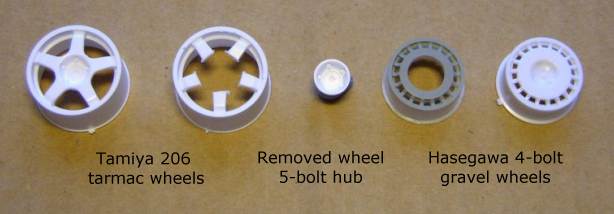
I started by making a set of gravel wheels for the model. Renaissance
recommends using their gravel wheels and tires with the kit, but these
wheels can't be used straight from the box because they have 4 bolt hubs
and 206 has 5 bolt hubs. Renaissance's wheels are resin copies of Hasegawa's
gravel wheels, so I decided to use normal plastic wheels from a Hasegawa
Mitsubishi kit because plastic is easier to work with than resin. I sawed
off the 5-bolt hubs from Tamiya's tarmac wheels, sanded the leftovers
of the spokes off to make the hub round and drilled a same sized hole
to Hasegawa's wheel. Then I glued the hub into the hole and made the seam
invisible with some putty.
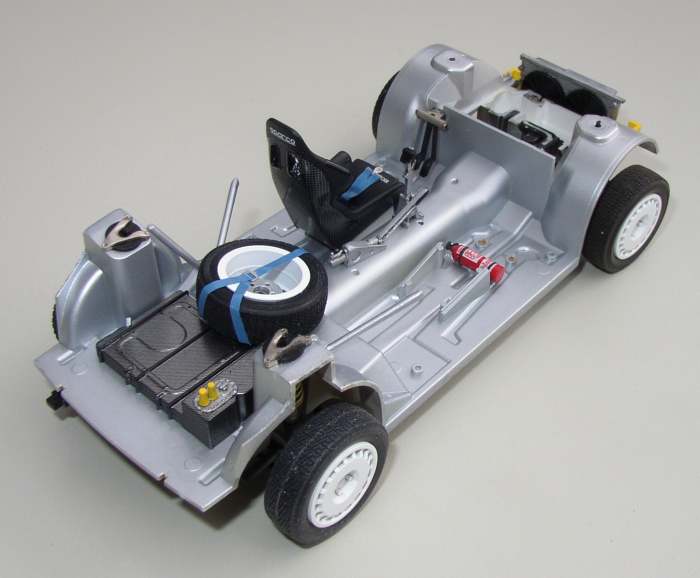
Underbody
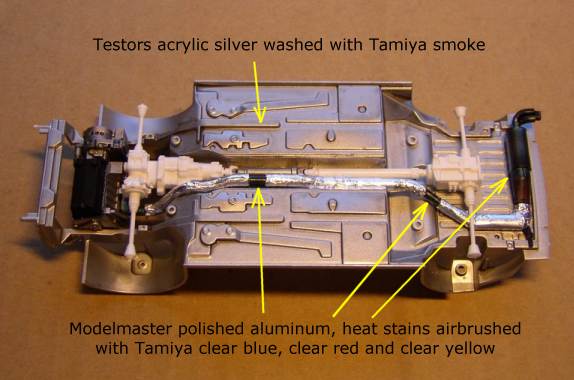
Kit's underbody is quite nice even straight from the box,
but I decided to give it some extra details. I painted the whole underbody
(underside and interior side) with Testor's silver and the engine parts
according to the instructions. Then I gave the underside a wash with Tamiya's
smoke acrylic to bring out details and give it a weathered look.
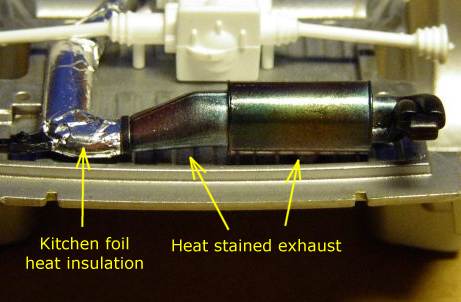
Exhaust pipe was first painted with Modelmaster polished
aluminum and then the places visible from under the heat insulation were
airbrushed with Tamiya's clear paints to make them look discolored by
heat. Heat insulation was made from thin kitchen foil and it was attached
with Microscale Kristal Klear -glue. Actually the heat insulation should
have a texture similar to the texture in transmission tunnel, but after
several attempts I decided to leave it without the texture as the texture
was lost so easily when the foil was glued to the exhaust. Finally the
exhaust heat insulation was given a coat of Microscale satin clear and
a bit yellow discoloration on bends and ends of the insulation.
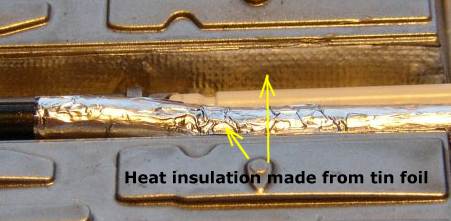
Transmission tunnel was detailed by covering it with a heat
insulation made from tin foil cut out of a food tray. The texture was
made by rubbing the foil on a piece of fine net.
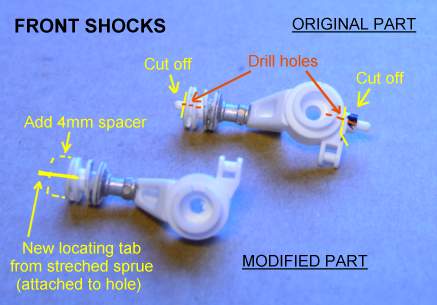
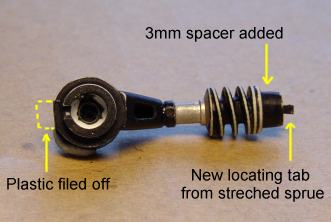
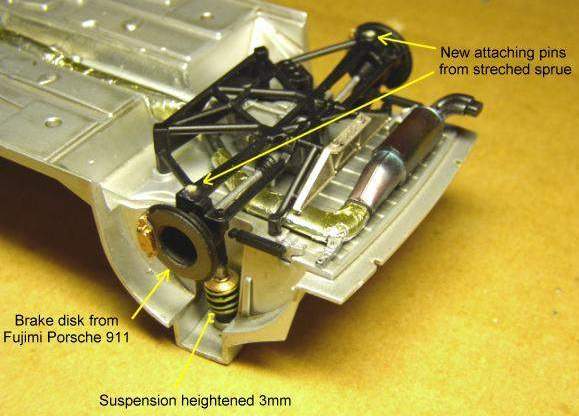
Suspension
Suspension needs to be heightened about 3 millimetres at rear and 4mm
at front to bring it to correct set up for gravel. Fortunately this is
quite easy by only modifying the front and rear shocks, which will then
attach to their places like the original parts. Even though I wrote on
the picture that the rear shock needs a 3 mm spacer I later noticed that
it needs about 0.5 mm more so the car wont look too rear heavy. Check
out the correct width for spacer before gluing anything on place. The
lower parts of the shocks were attached with pins of streched sprue plugged
true holes drilled on the suspension A-arms. Holes for locating these
sprue tabs were drilled on lower parts of the shocks (orange lines on
front shock picture).
Because the gravel wheels are smaller diameter than tarmac
wheels also the brake discs need to be smaller in order to fit the wheels.
The rear brakes from the kit can be used in front, but the rear disks
need to be taken from some other kit. I used a pair from my parts box
and I believe these discs were originally from Fujimi's Porsche 911 Carrera
2 kit.
Body
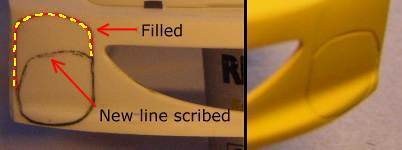
As I mentioned earlier, Timo's car had a newer type front bumper than
the one included in the kit. The difference is most visible with the light
covers which are higher on the old type bumper. I filled the upper part
of the light cover with putty and then scribed a new line. Unfortunately
I wasn't paying enough attention here and the new light covers ended up
in wrong shape. I should have been more careful...
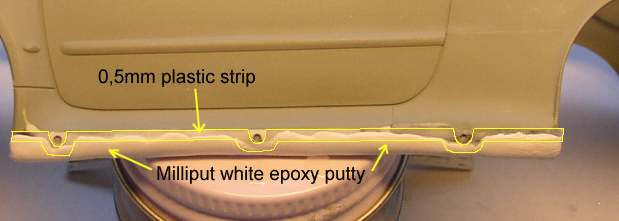
Another visible difference were the gravel shields on sides. I first
made the cover in front of rear wheel by gluing a piece of overhead projector
transparent (thin plastic sheet) cut to shape on the body. Then the lower
gravel shields were made by first gluing a strip of 0.5mm plastic strip
on the body and then blending it with Milliput epoxy putty to look like
the shield extends below the car . The yellow line in the picture shows
the shape of the strip.
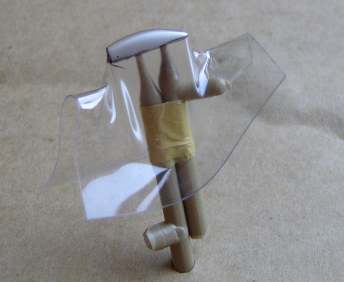
Timo's 206 had also an extra air scoop on the roof. I made it by heat
forming a piece of plastic over a mould made from plastic I had filed
to correct shape.
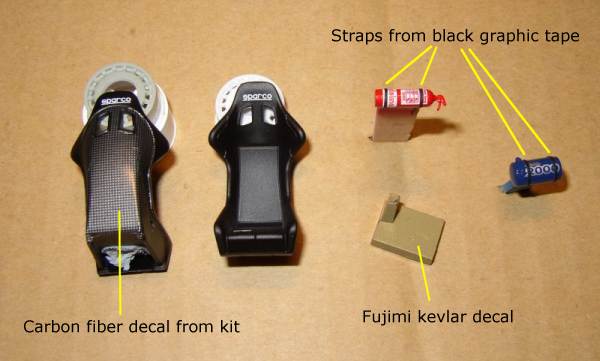
Interior
The kit's interior is quite good even straight from the box with the
exception of seat belts which are supplied only as decals. I made new
belts from Tamiya masking tape painted in correct shade of blue. Belt
buckles were taken from Reji model's etched sheet. I added carbon fibre
texture on some parts with Scale Motorsports carbon decal. Carbon texture
for the seats was included on the kit's decal sheet. The gravel spare
wheel and tyre were originally from Hasegawa's Lancia Integrale. The wheel
is actually completely different looking than the Enkei wheels, but as
it's upside down it's impossible to see any difference. I detailed the
wheel by adding a round piece of plastic with bolt holes in the centre
of the wheel. The belt holding the wheel in place was also made from painted
masking tape and the buckle is an etched piece found from the parts box.
I added a map pouch on the co-driver's side door. The pouch was made from
a corner of transparent plastic bag, then some papers ('maps') were folded
in it and the whole package was then glued to the door with strips of
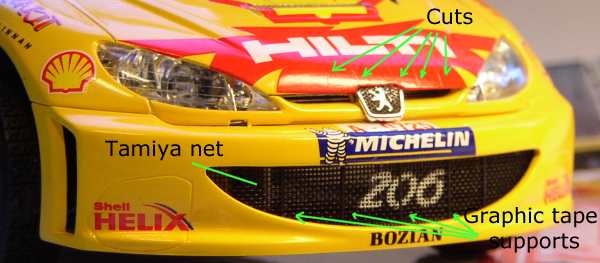
graphic tape as supports.
Interior was painted in the same Testor's silver as the
bottom. Fuel tank was covered in Scale Motorsport black/pewter carbon
fibre decal. Be sure you have decal setting solutions if you are using
SMS carbon decals, because otherwise it practically impossible to make
the decal contour detailed surfaces. I used Microscale's Micro Set and
Micro Sol and they worked perfectly with the decals.
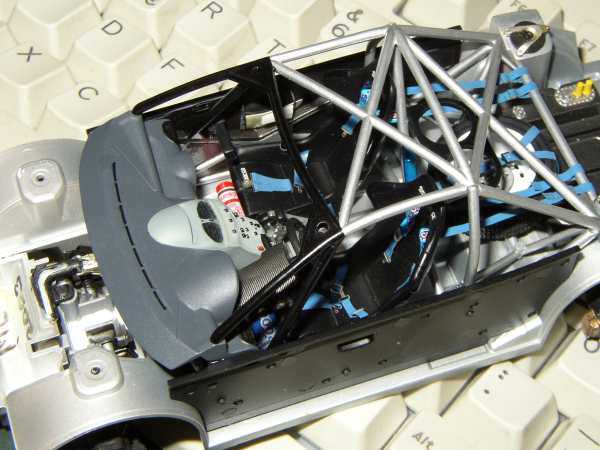
Complete interior with the roll cage attached. Map bag can be seen in
the middle of co-drivers door. Roll cage was painted with Humbrol silver
and Tamiya black and finally it was given a coat of Johnson's Future (Klear)
acrylic floor polish which gave it a nice uniform shine. Shoulder belts
on the seats came out a bit too short but I didn't bother to remake them
because they are quite fiddly to route through all the buckles.
Painting the body
& adding the decals
Body parts and the front bottom shield were airbrushed with a custom
yellow mix made by mixing orange and yellow Tamiya acrylics. If I were
to made this kit again I'd use automotive touch up paint because Tamiya
acrylics take ages to cure and can't stand much of handling. I ended up
having my fingerprint on paint after almost two months of curing... Fortunately
I managed to sand it off the paint with polishing kit.
After the paint was polished with LMG polishing kit the
window trims and other details were painted with semigloss Tamiya black.
When I test fitted the body on the chassis I found out that the window
part stays in place without glue as the roll cage pushes it against the
body. That way there's no trouble from glue smears when attaching the
glass.
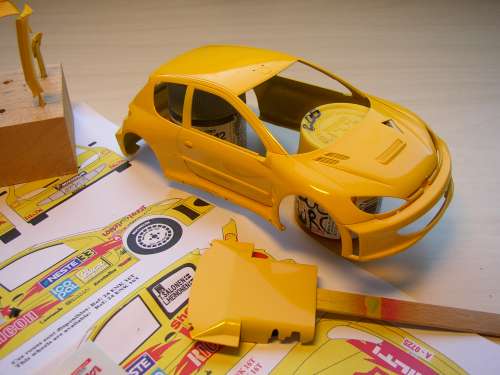
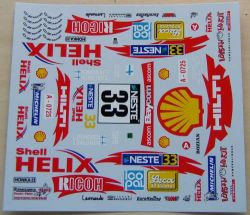
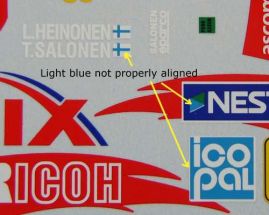
This was my first experience with Renaissance's decals.
On the sheet they looked very nice. Only trouble I noticed was that the
light blue was slightly misaligned.
The decals went on quite well on the body. They were a bit brittle and
didn't want to conform around all the contours without careful positioning,
cutting and using of decal solvents. Micro Set/Sol didn't work too effectively
with these decals. Once the decals were on the car looked very nice.
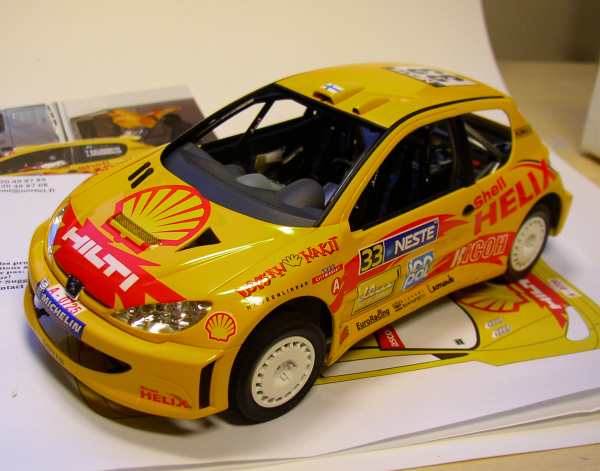
I had to cut the decal on the front of the bonnet because otherwise there
would have been ugly wrinkles. The cuts aren't pretty but it lesser of
two evils. I made the screen on the air intake from the net supplied in
the kit. Screen has five vertical supports which I made from thin black
graphic tape.
Finishing
touches
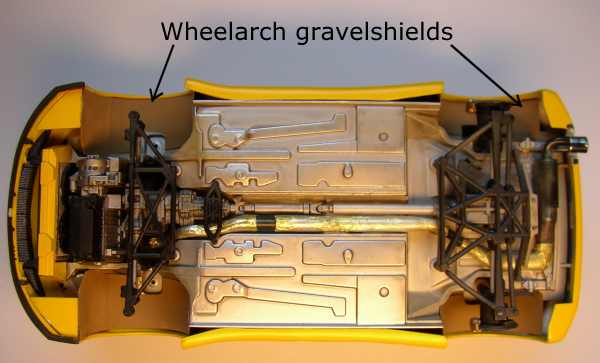
Once the body was on the chassis I added gravel shields
to the wheelarches because the kit has big gaps between the body and wheelarches
and these may show some light through if seen from certain angles. Shields
were made from overhead projector transparent cut to shape and painted
in Tamiya desert yellow.
The rear wing didn't fit too well so I had to sand and file
a little of it for a proper fit. After that the final details were added.
The bonnet fasteners are etched parts from some Hasegawa rally car's etched
sheet. Mudflaps were made from mudflap material snatched from another
Hasegawa rally car kit (these have usually enough material for two cars).
Some Scale Motorsport's etched boltheads were attached in places to add
detail. The roof aerials are from streched sprue and Sakatsu aftermarket
parts (the front aerial and its base). Mirrors were covered in SMS carbon
fibre and the seura-decals on them were printed with a laser printer on
a clear decal sheet (Renaissance has missed these on their sheet).
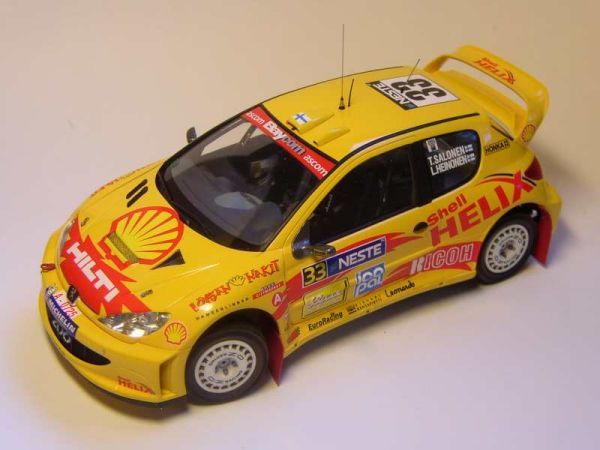
Finally the model was given a subtle weathering with airbrush
to make it look a little dusty. You can see the final result at the Finished
model page.
7.8.2003 |